GitHub Actions: Providing Data Scientists With New Superpowers
A Tutorial on GitHub Actions For Data Scientists
What Superpowers?
Hi, I’m Hamel Husain. I’m a machine learning engineer at GitHub. Recently, GitHub released a new product called GitHub Actions, which has mostly flown under the radar in the machine learning and data science community as just another continuous integration tool.
Recently, I’ve been able to use GitHub Actions to build some very unique tools for Data Scientists, which I want to share with you today. Most importantly, I hope to get you excited about GitHub Actions, and the promise it has for giving you new superpowers as a Data Scientist. Here are two projects I recently built with Actions that show off its potential:
fastpages
fastpages is an automated, open-source blogging platform with enhanced support for Jupyter notebooks. You save your notebooks, markdown, or Word docs into a directory on GitHub, and they automatically become blog posts. Read the announcement below:
We're launching `fastpages`, a platform which allows you to host a blog for free, with no ads. You can blog with @ProjectJupyter notebooks, @office Word, directly from @github's markdown editor, etc.
— Jeremy Howard (@jeremyphoward) February 24, 2020
Nothing to install, & setup is automated!https://t.co/dNSA0oQUrN
Machine Learning Ops
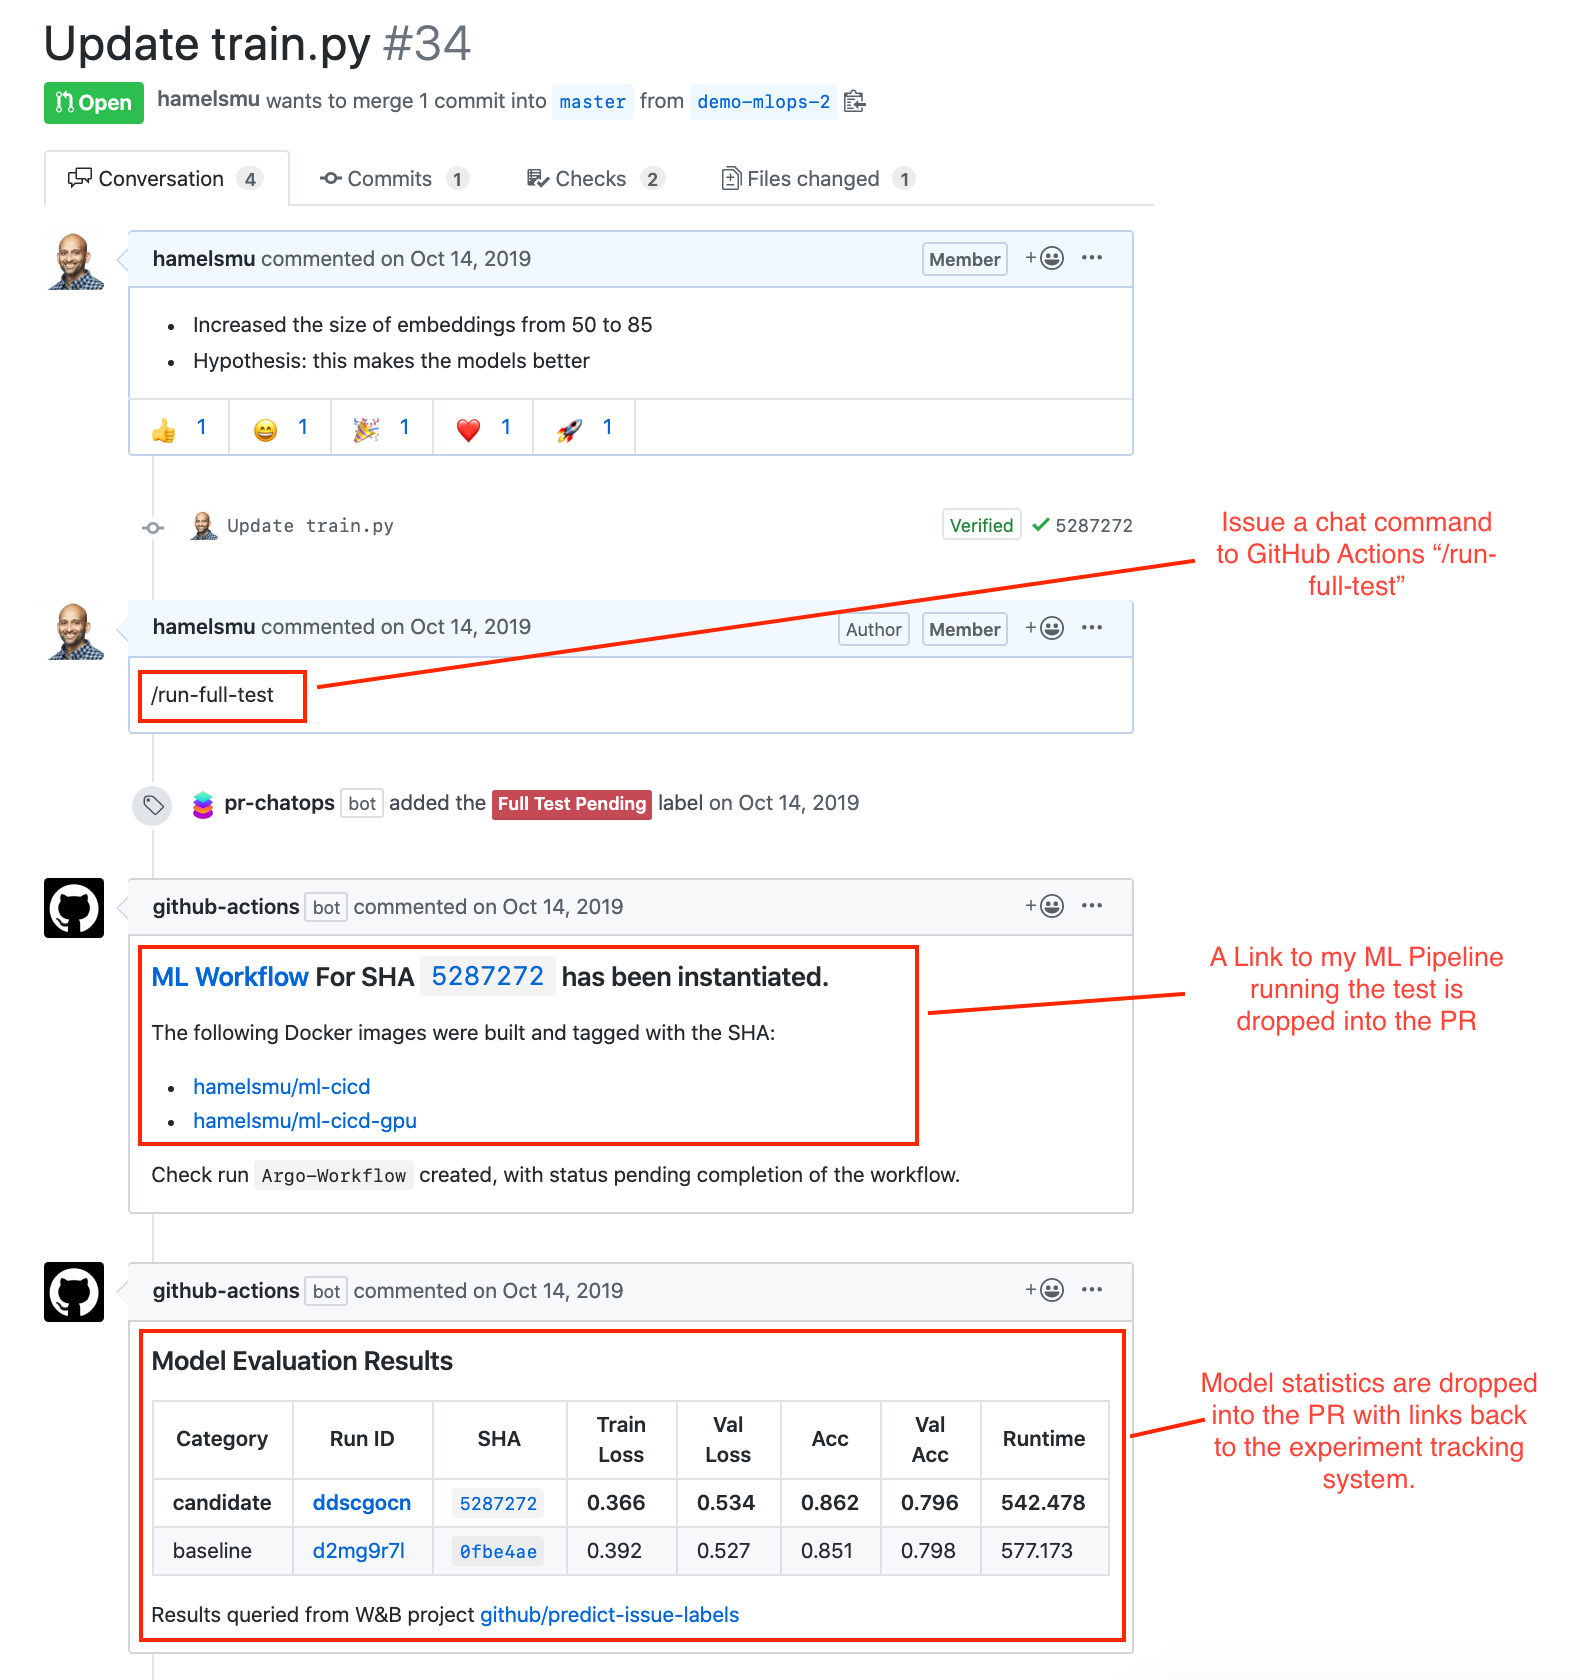
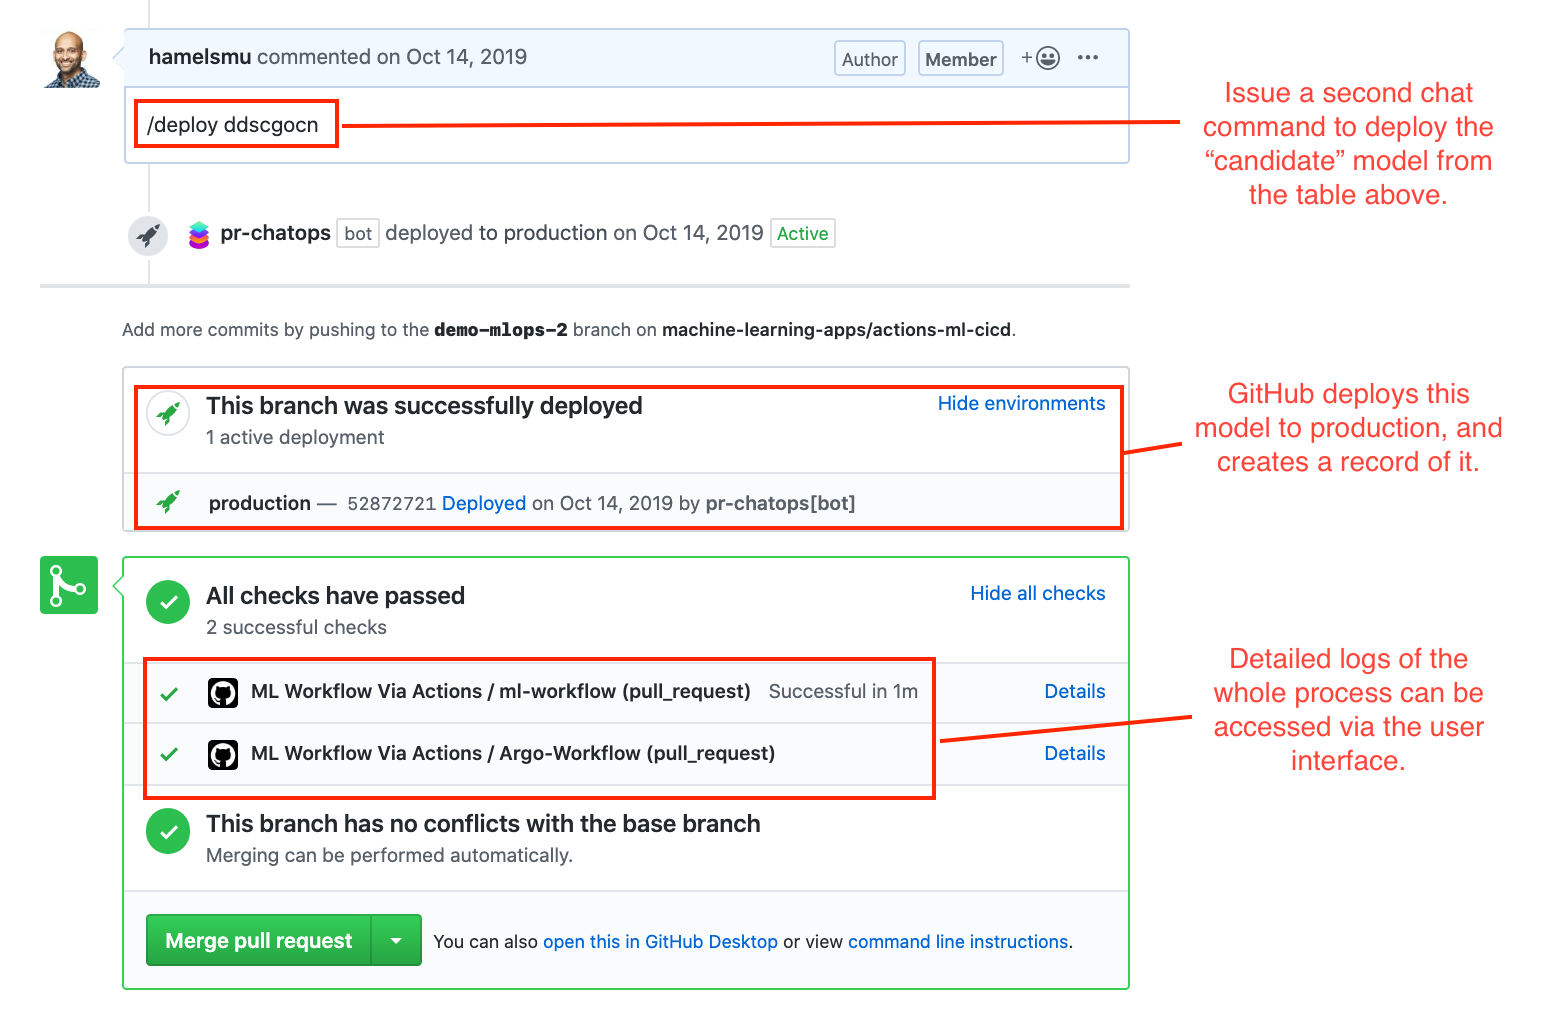
Wouldn’t it be cool if you could invoke a chatbot natively on GitHub to test your machine learning models on the infrastructure of your choice (GPUs), log all the results, and give you a rich report back in a pull request so that everyone could see the results? You can with GitHub Actions!
Consider the below annotated screenshot of this Pull Request:
A more in-depth explanation about the above project can be viewed in this video:
Using GitHub Actions for machine learning workflows is starting to catch on. Julien Chaumond, CTO of Hugging Face, says:
GitHub Actions are great because they let us do CI on GPUs (as most of our users use the library on GPUs not on CPUs), on our own infra! 1
Additionally, you can host a GitHub Action for other people so others can use parts of your workflow without having to re-create your steps. I provide examples of this below.
A Gentle Introduction To GitHub Actions
What Are GitHub Actions?
GitHub Actions allow you to run arbitrary code in response to events. Events are activities that happen on GitHub such as:
- Opening a pull request
- Making an issue comment
- Labeling an issue
- Creating a new branch
- … and many more
When an event is created, the GitHub Actions context is hydrated with a payload containing metadata for that event. Below is an example of a payload that is received when an issue is created:
{
  "action": "created",
  "issue": {
    "id": 444500041,
    "number": 1,
    "title": "Spelling error in the README file",
    "user": {
      "login": "Codertocat",
      "type": "User",
    },
    "labels": [
      {
        "id": 1362934389,
        "node_id": "MDU6TGFiZWwxMzYyOTM0Mzg5",
        "name": "bug",
        }
     ],
     "body": "It looks like you accidently spelled 'commit' with two 't's."
}
This functionality allows you to respond to various events on GitHub in an automated way. In addition to this payload, GitHub Actions also provide a plethora of variables and environment variables that afford easy to access metadata such as the username and the owner of the repo. Additionally, other people can package useful functionality into an Action that other people can inherit. For example, consider the below Action that helps you publish python packages to PyPi:
The Usage section describes how this Action can be used:
- name: Publish a Python distribution to PyPI
  uses: pypa/gh-action-pypi-publish@master
  with:
    user: __token__
    password: ${{ secrets.pypi_password }}
This Action expects two inputs: user and a password. You will notice that the password is referencing a variable called secrets, which is a variable that contains an encrypted secret that you can upload to your GitHub repository. There are thousands of Actions (that are free) for a wide variety of tasks that can be discovered on the GitHub Marketplace. The ability to inherit ready-made Actions in your workflow allows you to accomplish complex tasks without implementing all of the logic yourself. Some useful Actions for those getting started are:
- actions/checkout: Allows you to quickly clone the contents of your repository into your environment, which you often want to do. This does a number of other things such as automatically mount your repository’s files into downstream Docker containers.
- mxschmitt/action-tmate: Proivdes a way to debug Actions interactively. This uses port forwarding to give you a terminal in the browser that is connected to your Actions runner. Be careful not to expose sensitive information if you use this.
- actions/github-script: Gives you a pre-authenticated ocotokit.js client that allows you to interact with the GitHub API to accomplish almost any task on GitHub automatically. Only these endpoints are supported (for example, the secrets endpoint is not in that list).
In addition to the aforementioned Actions, it is helpful to go peruse the official GitHub Actions docs before diving in.
Example: A fastpages Action Workflow
The best to way familiarize yourself with Actions is by studying examples. Let’s take a look at the Action workflow that automates the build of fastpages (the platform used to write this blog post).
Part 1: Define Workflow Triggers
First, we define triggers in ci.yaml. Like all Actions workflows, this is a YAML file located in the .github/workflows directory of the GitHub repo.
The top of this YAML file looks like this:
name: CI
on:
  push:
    branches:
      - master
  pull_request:
This means that this workflow is triggered on either a push or pull request event. Furthermore, push events are filtered such that only pushes to the master branch will trigger the workflow, whereas all pull requests will trigger this workflow. It is important to note that pull requests opened from forks will have read-only access to the base repository and cannot access any secrets for security reasons. The reason for defining the workflow in this way is we wanted to trigger the same workflow to test pull requests as well as build and deploy the website when a PR is merged into master. This will be clarified as we step through the rest of the YAML file.
Part 2: Define Jobs
Next, we define jobs (there is only one in this workflow). Per the docs:
A workflow run is made up of one or more jobs. Jobs run in parallel by default.
jobs:
  build-site:
    if: ( github.event.commits[0].message != 'Initial commit' ) || github.run_number > 1
    runs-on: ubuntu-latest
    steps:
The keyword build-site is the name of your job and you can name it whatever you want. In this case, we have a conditional if statement that dictates if this job should be run or not. We are trying to ensure that this workflow does not run when the first commit to a repo is made with the message ‘Initial commit’. The first variable in the if statement, github.event, contains a json payload of the event that triggered this workflow. When developing workflows, it is helpful to print this variable in order to inspect its structure, which you can accomplish with the following YAML:
    - name: see payload
      run: |
        echo "PAYLOAD:\n${PAYLOAD}\n"
      env:
        PAYLOAD: ${{ toJSON(github.event) }}
Note: the above step is only for debugging and is not currently in the workflow.
toJson is a handy function that returns a pretty-printed JSON representation of the variable. The output is printed directly in the logs contained in the Actions tab of your repo. In this example, printing the payload for a push event will look like this (truncated for brevity):
{
  "ref": "refs/tags/simple-tag",
  "before": "6113728f27ae8c7b1a77c8d03f9ed6e0adf246",
  "created": false,
  "deleted": true,
  "forced": false,
  "base_ref": null,
  "commits": [
    {
      "message": "updated README.md",
      "author": "hamelsmu"
    },
  ],
  "head_commit": null,
}
Therefore, the variable github.event.commits[0].message will retrieve the first commit message in the array of commits. Since we are looking for situations where there is only one commit, this logic suffices. The second variable in the if statement, github.run_number is a special variable in Actions which:
[is a] unique number for each run of a particular workflow in a repository. This number begins at 1 for the workflow’s first run, and increments with each new run. This number does not change if you re-run the workflow run.
Therefore, the if statement introduced above:
if: ( github.event.commits[0].message != 'Initial commit' ) || github.run_number > 1
Allows the workflow to run when the commit message is “Initial commit” as long as it is not the first commit. ( || is a logical or operator).
Finally, the line runs-on: ubuntu-latest specifies the host operating system that your workflows will run in.
Part 3: Define Steps
Per the docs:
A job contains a sequence of tasks called steps. Steps can run commands, run setup tasks, or run an Action in your repository, a public repository, or an Action published in a Docker registry. Not all steps run Actions, but all Actions run as a step. Each step runs in its own process in the runner environment and has access to the workspace and filesystem. Because steps run in their own process, changes to environment variables are not preserved between steps. GitHub provides built-in steps to set up and complete a job.
Below are the first two steps in our workflow:
   - name: Copy Repository Contents
     uses: actions/checkout@master
     with:
       persist-credentials: false

   - name: convert notebooks and word docs to posts
     uses: ./_action_files
The first step creates a copy of your repository in the Actions file system, with the help of the utility action/checkout. This utility only fetches the last commit by default and saves files into a directory (whose path is stored in the environment variable GITHUB_WORKSPACE that is accessible by subsequent steps in your job. The second step runs the fastai/fastpages Action, which converts notebooks and word documents to blog posts automatically. In this case, the syntax:
uses: ./_action_files
is a special case where the pre-made GitHub Action we want to run happens to be defined in the same repo that runs this workflow. This syntax allows us to test changes to this pre-made Action when evaluating PRs by referencing the directory in the current repository that defines that pre-made Action. Note: Building pre-made Actions is beyond the scope of this tutorial.
The next three steps in our workflow are defined below:
    - name: setup directories for Jekyll build
      run: |
        rm -rf _site
        sudo chmod -R 777 .

    - name: Jekyll build
      uses: docker://fastai/fastpages-jekyll
      with:
        args: bash -c "gem install bundler && jekyll build -V"
      env:
        JEKYLL_ENV: 'production'

    - name: copy CNAME file into _site if CNAME exists
      run: |
        sudo chmod -R 777 _site/
        cp CNAME _site/ 2>/dev/null || :
The step named setup directories for Jekyll build executes shell commands that remove the _site folder in order to get rid of stale files related to the page we want to build, as well as grant permissions to all the files in our repo to subsequent steps.
The step named Jekyll build executes a docker container hosted by the Jekyll community on Dockerhub called jekyll/jekyll. For those not familiar with Docker, see this tutorial. The name of this container is called fastai/fastpages-jekyll because I’m adding some additional dependencies to jekyll/jekyll and hosting those on my DockerHub account for faster build times2. The args parameter allows you to execute arbitrary commands with the Docker container by overriding the CMD instruction in the Dockerfile. We use this Docker container hosted on Dockerhub so we don’t have to deal with installing and configuring all of the complicated dependencies for Jekyll. The files from our repo are already available in the Actions runtime due to the first step in this workflow, and are mounted into this Docker container automatically for us. In this case, we are running the command jekyll build, which builds our website and places relevant assets them into the _site folder. For more information about Jekyll, read the official docs. Finally, the env parameter allows me to pass an environment variable into the Docker container.
The final command above copies a CNAME file into the _site folder, which we need for the custom domain https://fastpages.fast.ai. Setting up custom domains are outside the scope of this article.
The final step in our workflow is defined below:
  - name: Deploy
    if: github.event_name == 'push'
    uses: peaceiris/actions-gh-pages@v3
    with:
      deploy_key: ${{ secrets.SSH_DEPLOY_KEY }}
      publish_dir: ./_site
The statement
if: github.event_name == 'push'
uses the variable github.event_name to ensure this step only runs when a push event ( in this case only pushes to the master branch trigger this workflow) occur.
This step deploys the fastpages website by copying the contents of the _site folder to the root of the gh-pages branch, which GitHub Pages uses for hosting. This step uses the peaceiris/actions-gh-pages Action, pinned at version 3. Their README describes various options and inputs for this Action.
Conclusion
We hope that this has shed some light on how we use GitHub Actions to automate fastpages. While we only covered one workflow above, we hope this provides enough intuition to understand the other workflows in fastpages. We have only scratched the surface of GitHub Actions in this blog post, but we provide other materials below for those who want to dive in deeper. We have not covered how to host an Action for other people, but you can start with these docs to learn more.
Still confused about how GitHub Actions could be used for Data Science? Here are some ideas of things you can build:
- Jupyter Widgets that trigger GitHub Actions to perform various tasks on GitHub via the repository dispatch event
- Integration with Pachyderm for data versioning.
- Integration with your favorite cloud machine learning services, such Sagemaker, Azure ML or GCP’s AI Platform.
Related Materials
- GitHub Actions official documentation
- Hello world Docker Action: A template to demonstrate how to build a Docker Action for other people to use.
- Awesome Actions: A curated list of interesting GitHub Actions by topic.
- A tutorial on Docker for Data Scientists.
Getting In Touch
Please feel free to get in touch with us on Twitter:
- Hamel Husain @HamelHusain
- Jeremy Howard @jeremyphoward
Footnotes
-
You can see some of Hugging Face’s Actions workflows for machine learning on GitHub ↩
-
These additional dependencies are defined here, which uses the “jekyll build” command to add ruby dedpendencies from the Gemfile located at the root of the repo. Additionally, this docker image is built by another Action workflow defined here. ↩